Wednesday, March 28, 2012

Can I call myself a spinner yet?


Last week I was fortunate enough to find an Ashford wheel for very cheep. As I am new to this hobby I did not want to invest much money in my first wheel, but did hope that for the small price I paid I wouldn't be receiving a total lemon.  Luckily for me, after doing some simple maintenance on the wheel (new hooks, leather piece, string, and a bit of oil) it is running smoothly. I did a little research and believe this wheel was made circa 1975, judging by this timeline


What I was most excited about was that it was a vintage Ashford wheel. Ashford is a New Zealand company, that was founded by Walter Ashford in 1934. Ashford designed flat pack wheels for people to use during war time and following there after. It has evolved to become a leading producer of top quality spinning and weaving equipment.

 ~ One must wear an apron when spinning ~

 ~ Beautiful fleece from a merino sheep in Oberon ~


I have been teaching myself to spin via youtube videos, online articles and books. The skill of spinning is evolving slowly. I have mastered the motion of the treadle, however my grafting leaves a lot to be desired! My yarn is spinning well sometimes, and other times it is over spun and twists up too much. I am troubleshooting this problem and can see I am getting better and stopping this happening. 

~ Some twisty bits in there! ~

Practice makes perfect right? 

But the good news is I very much enjoy it and look forward to when my skills improve.

It is also important to note: spinning (like any other fabric/yarn craft) appears to be a cat magnet. But even more so when the slight scent of sheep is in the air...

Sam xox

Monday, March 19, 2012

Come in spinner.

My appreciation for fine quality wool has grown alongside my love affair with knitting. Extra fine merino... baby alpaca... Shetland wool... All so lovely against the skin and far more inviting than the typical acrylic sold at my local Spotlight. While I move and loop the beautiful yarns in my hands, my mind traces over the journey these fibres have had before they reach my needles. The process of making wool into knitting yarn. This lead me to toy with the idea of spinning my own wool. 

I took action. On Saturday I became a member of my local Spinners and Weavers Guild!

After some googling and a few emails I found the group and was warming invited to attend their meeting (which also happened to be their Annual General Meeting!). When I arrived at the Community Hall I was greeted with the sound of treadling wooden wheels, chatter and laughter. Pikelets, an assortment of cakes, and cups of tea were spread out across the high table squeezed tightly into the hall kitchen. I watched as the ladies each took a turn at show and tell, and I learnt about a unique breed of New Zealand sheep that can be shorn every six months (the name of the breed escapes me at this very moment). 

The Guild ladies were all very welcoming and patiently answered my 1001 questions. I was supplied with a bag of fleece (fresh from the sheep!) for practicing purposes, a spinning wheel to borrow and a book on loan from the Guild library.

I am set up to spin!

~ My first fleece for practice ~

~ Combing the wool in preparation for spinning ~


~ A small amount of white wool I was also gifted. Preparing to be washed ~


After a few hours of practice I am beginning to see some progress. My treadling is beginning to become smooth and I am achieving a few meters at a time of well spun wool - in between these meters are quite a lot of mistakes ;-)

Sam xox

Sunday, March 18, 2012

Serger Series – Tips on saving money stitching.


This is the final instalment of the Serger Series. Today I wanted to share with you a simple money saving tip that I find really useful, especially when I need to serge with thread colours that I don't normally use (think red, green, blue, etc).

Serger threads can cost quite a bit of money. In Australia I typically see them for around $6.00 each. If I am stitching with four threads that can become quite expensive! So if you have a more unusual colour you want to stitch with, but know you probably won’t stitch with the colour again any time soon, why not only buy two spools instead of four? 


 ~Melrose 12-pack neutral colour serger thread ~

Use the two spools of the colour that match your garment as the bottom looper threads, and use a neutral thread colour for the needle threads. As the needle threads only provide tiny stabilising stitches, no one is really going to notice. This means you get the right colour stitches for half the price! (Note: This works just as well for three thread stitching too).

I really hope you've all found this series helpful. I have very much enjoyed sharing it with you!

Sam xox

Disclaimer: Always refer to your own serger/overlocker manual for definitive advice on how to set up, thread and sew with your machine. I do not claim to be an expert on every model and thus am only sharing my personal experiences using two ‘lower end’ models (Toyota3400d and Janome1110dx). Also, I am in no way affiliated with the Melrose thread. I am simply giving an example of some neutral colour options.

Tuesday, March 13, 2012

Serger Series – Three thread sewing and rolled hems.


Due to a very busy weekend there has been some radio silence on the Serger Series! It has been fantastic reading your comments and emails, and especially encouraging to hear that these posts are inspiring some of you to dust off your sergers! Eileen left an especially lovely comment: "I am loving your serger series and have been checking your site daily for entries. I bought a serger about a year ago and have used it very little (I think I have been intimidated). But after I read your article I took it out and rethreaded it (I tried once and was unable to). Not only did I get it right but the stitches were right on (I did the 4 color thread as you had suggested). Thank you so much for sharing your knowledge, and for inspiring me!" I am thrilled that these posts encouraged you so Eileen! Can't wait to see what you stitch up!

*   *   *   *   *   *   *

Three thread sewing is possible using a serger. This technique uses one needle and two lower threads (remove the left needle when stitching). Three thread seams are perfect for medium to heavy weight fabrics as they are not as bulky. If you have the ability on your machine to change the needle position, this gives additional ability to adjust the stitch width.

 The left needle is removed, and the yellow thread hangs loose.

Tension adjustment principles are the same for three thread sewing as is for four thread sewing. Maintain a balance between the two looper threads and ensure the needle thread is stabilising correctly...

 Do you see the yellow thread is missing?

A rolled hem is another way to finish off seams in a decorative way. Rolled hems look fantastic on light weight fabrics by adding professional details to skirt hems and the edges of sleeves. A rolled hem can also look great on children's clothing, as it gives a lighter result than a heavy double folded hem. As I am not across all serger models, I suggest you refer to your serger manual for specific directions on how to set your machine up to sew a rolled hem. When you do, it will look something like this...


Sam xox

Disclaimer: Always refer to your own serger/overlocker manual for definitive advice on how to set up, thread and sew with your machine. I do not claim to be an expert on every model and thus am only sharing my personal experiences using two ‘lower end’ models (Toyota3400d and Janome1110dx).

Friday, March 9, 2012

Serger Series – Differential machines.


You might be wondering what on earth it means when a serger is labelled ‘differential’. Let me explain. This is truly an awesome thing. Being a differential machine, this allows you control of the stitching stability on all types of fabric. When serging a cotton fabric, you will keep the machines differential setting in ‘neutral’. 

 The two extremes of the differential settings shown on cotton fabric. 
Too tight and it pulls in the fabric, too loose and it becomes really wavy.

However, if you were to sew a knit fabric on the same setting, you will notice it become stretched and wavy, not sitting nicely at all. By changing the setting you have control over the tension of the sewing in this way also. As there are so many different variables, I simply suggest keeping a decent amount of scrap fabric from your sewing project, and running this through the machine prior to serging the actual garment. That was you know you have the tension right AND your differential feed right.


On a side note – did you know you can change your stitch length the same way you can on your regular sewing machine? Be sure to refer to your manual and search ‘stitch length’ to discover how to do this on your machine.

Sam xox

Disclaimer: Always refer to your own serger/overlocker manual for definitive advice on how to set up, thread and sew with your machine. I do not claim to be an expert on every model and thus am only sharing my personal experiences using two ‘lower end’ models (Toyota3400d and Janome1110dx).

Wednesday, March 7, 2012

Serger Series – Tools of the trade.

Here is the list of equipment I must have on hand when serging:


 Long tweezers – These make threading a serger a piece of cake – seriously. They allow for precise threading in those difficult to reach places on the lower loopers, as well as better access when threading the needles.

Machine oil – It is very important you keep your machine running smoothly for best results. This means that you should regularly (6 months) oil all accessibly parts of your serger that move. They only require the smallest amount of oil to lubricate them. You will notice a difference. When opening a machine oil bottle for the first time, I would recommend piercing the top with a warm needle or pin, the tiny hole allows for better oil control when using (you definitely do not want to cover your overlocker with half a bottle of oil because the hole was cut too large).


 Bristle brushes – Regularly brushing out your machine after sewing prevents a build up of fibres that potentially could interfere with your stitching.


Needles – Change your needles people! Regularly! Ideally after every 8 hours of sewing.


Screwdrivers – Allow you to pull apart your serger for better access when servicing at home.


Quick snips – Perfect for snipping threads on the go.

Sam xox

Liberty of London fabrics from top: Mauverina, Betsy, ?, Wiltshire, Glenjade.

Disclaimer: Always refer to your own serger/overlocker manual for definitive advice on how to set up, thread and sew with your machine. I do not claim to be an expert on every model and thus am only sharing my personal experiences using two ‘lower end’ models (Toyota3400d and Janome1110dx).

Tuesday, March 6, 2012

Serger Series – Changing thread colour.


I'm so glad you all found the first Serger Series post helpful!

Here’s my tips for those times when you need to change thread colour. Don’t be tempted to keep serging in white because you don’t have time/patients to change thread and potentially have to adjust tension again. Instead, follow these steps:
1) Do not unthread your machine!
2) Instead, cut off the thread you have been sewing with at the spool. Remove old spools.
3) Play new colour spools in place.
4) Tie correlating old thread to new thread and snip off extra lengths to make a neat knot...


5) Make sure your presser foot is in the raised position.
6) Now snip off the needle threads at the needle. Pull the thread through until you get to the needle (note: pull thread gentle through tension discs as the knot might be a bit tricky to get through). Once knot is through and at needle, snip off old thread and thread new thread through both needles.
7) The looper threads are easier. Pull thread gentle through tension plates, then they should be ready to stitch from there.

Sam xox

Disclaimer: Always refer to your own serger/overlocker manual for definitive advice on how to set up, thread and sew with your machine. I do not claim to be an expert on every model and thus am only sharing my personal experiences using two ‘lower end’ models (Toyota3400d and Janome1110dx).

Monday, March 5, 2012

Serger Series – Threading a rainbow.


Introducing Serger Series! A 'hints and tips' series to help you improve your serging, or even inspire you to give serging a try! If you have any questions along the way, please feel free to leave a comment below, and I will hopefully be able to help you out.

Serger Series is not intended to replace your machines instruction manual. Please refer to your manual for instructions on how to thread your machine and maintain it. If you have a second hand serger, and don't have a manual, I would strongly suggest searching online for a copy of your sergers manual for download and print. I did this when I needed the manual for my old serger, and I remember it only cost a couple of dollars to purchase a manual online.

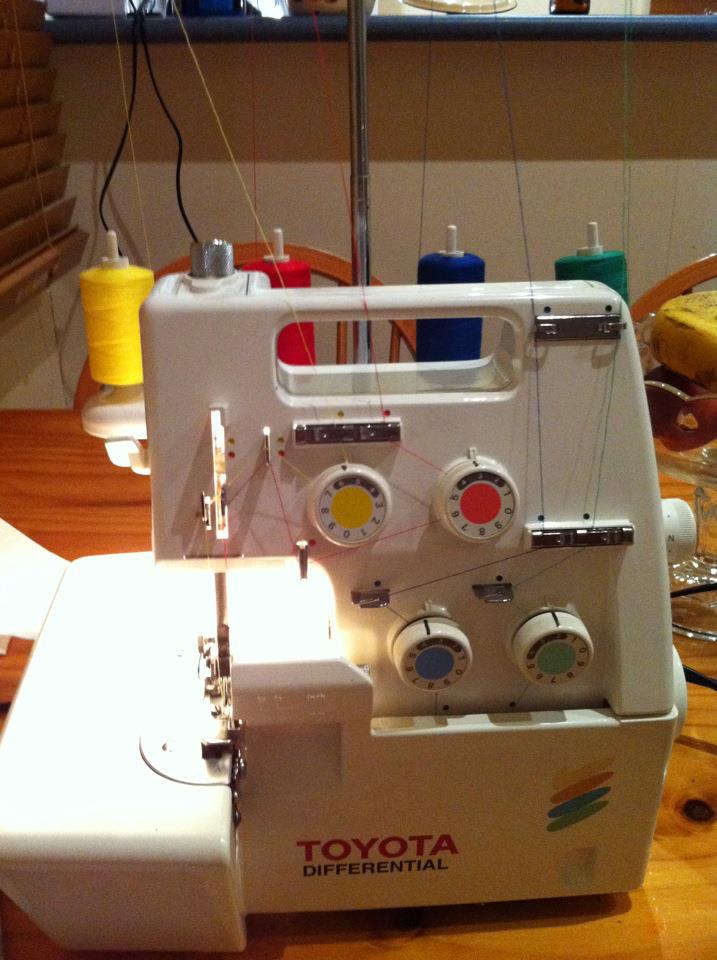
My number one tip for anyone learning to use their serger for the first time, is to thread it up in different colours! This means that you will be able to more easily identify the offending thread if your stitching tension is wrong. You will need:  1 serger and 4 spools of thread (yellow spool, red spool, blue spool, green spool).Use yellow, red, blue and green in the correlating places (refer to my picture). I promise you I’m not going to ask you to actually serge real garments with these threads, this is just a practice.

An example of my old machine threaded up - note the coloured threads match the tension knob colours.

My new machine threaded up according to the coloured dots (you might need to click to see it better)

When you look at your serger, yours might look a little different from mine. That’s ok! Threading them can be slightly different for each one. I would suggest referring to your instruction book to learn how to correctly thread your machine. If your serger was obtained second hand (just like my first one) type the model details into google and you are sure to find an online copy of your overlockers instruction booklet. Basically the main rules you need to follow when threading your serger, is to always thread from the right to left. 

Always make sure your presser foot is in the raised position when threading your machine. That way it is easy to pull the thread through (as the tension discs aren't engaged until the presser foot is down).


Machine now threaded up? Ok, back to the rainbow.

Sewing with a serger can be visualised best as a balance. You are stitching to balance. Your two looper (bottom) threads produce the ‘big’ stitches (red and green thread) while the needle threads provide the stabilising stitches (yellow and blue). You want your tension in all four to be balanced so that the stabilising stitches (blue and yellow) remain small and tight, whilst your red and green stitches sit flat with the fabric and meet at the fabric edge. This is the best way I can describe it, and really helps when trouble shooting your tension.

A comparison between one-colour serging and rainbow serging. The different colours make it very easy to identify which thread is causing the trouble. It also shows you the role each thread plays in the stitching.

Here is an example of incorrect tension... (click to enlarge)...

See? The green thread is being pulled over to the red thread side.

For this example, if your green thread is appearing on the red threads side, this could be due to two reasons: 1) Green tension is too loose
2) Red tension is too tight
You don’t know which it is, so trouble shoot by tightening the green tension dial by 1. Then test sew. If the problem is still present, loosen the red tension dial by 1. Then test sew. Continue until you are balanced and the threads sit nicely and meet at the edge again. Do you see the balance metaphor? Don’t be inclined to change only one dial more and more and more and expect to have symmetry and balance in your stitching. The machine needs to be gradually adjusted between the two threads until it sews right again...


Likewise for the needle threads (blue and yellow thread), although from my experience this is the least threads to play up.

You will find that when you change between sewing different weight fabrics, your tension will need to be adjusted. My tip would be to make a note somewhere (inside your manual cover?) of the correct tension settings when working with certain fabrics (wool, quilting weight cotton, rayon, etc) as a quick reference for the future.

Sam xox

Disclaimer: Always refer to your own serger/overlocker manual for definitive advice on how to set up, thread and sew with your machine. I do not claim to be an expert on every model and thus am only sharing my personal experiences using two ‘lower end’ models (Toyota3400d and Janome1110dx).